Jumper cables!!! It’s a situation no one wants to find themselves in: you turn the key in your car’s ignition, only to be met with the dreaded sound of silence.
A dead battery can happen at any time, and preparing for such a scenario is crucial. That’s where jumper cables come in.
In this PowerVersity guide, we will walk you through everything you need to know about jumpstarting your car with the help of jumper cables.
From understanding the basics of how jumper cables work to step-by-step instructions on the proper procedure, we’ve got you covered.
Say goodbye to the frustration of being stranded and gain the confidence to handle such a situation with ease.
So, grab your jumper cables and dive into the world of jumpstarting your car.
Jumper Cables 101: How Does Jumper Cables Work

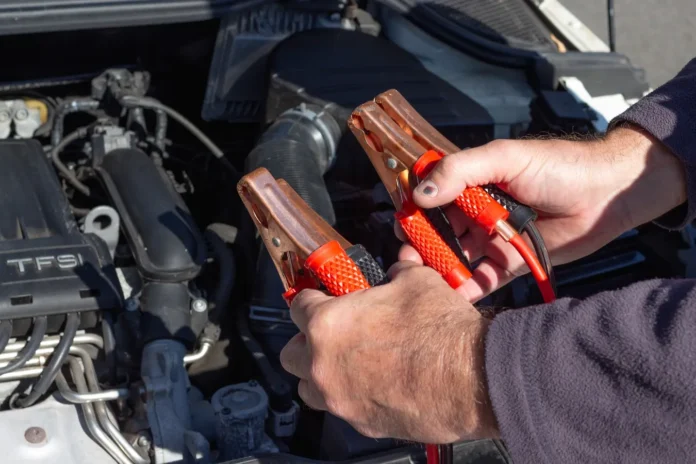
Jumper cables are a tool used to jumpstart a dead battery in a vehicle. They consist of two insulated cables with heavy-duty clamps on each end.
Each cable is color-coded, with one being red and the other black. The red cable is positive, while the black cable is negative.
To jumpstart a car using jumper cables, you will need another vehicle with a working battery. Park the two vehicles close enough so that the jumper cables can reach both batteries without the cars touching.
Make sure both vehicles are turned off and the keys are removed from the ignition.
Start by connecting the red clamp to the positive terminal of the dead battery. The positive terminal is usually indicated with a “+” sign and may be covered by a red plastic cap.
Ensure a secure connection by attaching the clamp firmly to the terminal.
Next, connect the other red clamp to the positive terminal of the working battery in the other vehicle.
Again, ensure a secure connection. Now, connect the black clamp to the negative terminal of the working battery. The negative terminal is usually indicated with a “-” sign and may be covered by a black plastic cap.
Secure the clamp tightly as well.
Finally, connect the remaining black clamp to an unpainted metal surface on the engine block of the vehicle with the dead battery – This serves as the grounding point to avoid sparks near the battery.
Once all the connections are in place, start the vehicle with the working battery and let it run for a few minutes. Then, try starting the vehicle with the dead battery.
If successful, keep both vehicles running for a few minutes to allow the dead battery to recharge. It is crucial to follow the correct sequence of connecting and disconnecting the jumper cables to avoid any accidents.
Always remove the cables in reverse order, starting with the black clamp from the engine block, followed by the black clamp from the working battery, then the red clamp from the working battery, and finally the red clamp from the dead battery.
Types Of Jumper Cables

One of the most important tools to have in your car is a good set of jumper cables. There are different types of jumper cables available, each with its own unique features and benefits.
The most common type of jumper cable is the traditional copper-clad aluminum cable. These cables are reliable and affordable, making them a popular choice for many car owners.
They are lightweight and easy to handle, making them convenient to use in emergency situations. However, they may not be as durable as other types of cables and may not provide as strong a connection.
For those looking for a more heavy-duty option, there are also heavy-duty copper cables available. These cables are made with pure copper, which offers superior conductivity and durability.
They are designed to handle higher levels of electrical current, making them ideal for larger vehicles or situations where a stronger connection is required.
Another option to consider is tangle-free jumper cables. These cables are designed with a unique design that prevents them from tangling during use, making them easier and quicker to set up.
This can be especially helpful in stressful situations where time is of the essence.
Lastly, there are also portable jumper cables available. These cables are compact and lightweight, making them easy to carry in your car or even in your bag.
They are designed for quick and convenient use, allowing you to jumpstart your car wherever you are.
When choosing the right type of jumper cables for your car, it’s important to consider your specific needs and preferences.
The size and type of your vehicle, as well as your level of experience, should be taken into account.
Step-By-Step Guide To Jumpstarting Your Car

Having a set of jumper cables can be a lifesaver. But if you’ve never used jumper cables before, the task can seem daunting.
Don’t worry! With this step-by-step guide, you’ll be able to jumpstart your car with ease.
Step 1
Look for someone with a working car who is willing to help jumpstart your vehicle. Make sure both cars are parked close enough for the jumper cables to reach both batteries.
Step 2
Identify the positive (+) and negative (-) terminals on both car batteries. They are usually marked with red and black plastic covers or labels.
Step 3
Connect the cables Start by connecting one end of the red (positive) jumper cable to the positive terminal of the dead battery.
Then, attach the other end of the red cable to the positive terminal of the working battery.
Next, connect one end of the black (negative) jumper cable to the negative terminal of the working battery.
Finally, attach the other end of the black cable to an unpainted metal surface on the car with the dead battery, like a bolt or bracket. This is known as grounding.
Step 4
Start the car with the working battery and let it run for a few minutes. This allows the battery to transfer some charge to the dead battery.
Step 5
Start the dead car Attempt to start the car with the dead battery. If it doesn’t start, wait a few more minutes and try again.
If it still doesn’t start, you may need to check the connections and try readjusting them.
Step 6
Once the dead car is running, begin removing the jumper cables in the reverse order in which they were connected.
Start by removing the black cable from the grounded metal surface on the dead car, then remove the black cable from the negative terminal of the working battery.
Next, remove the red cable from the positive terminal of the working battery,, and finally, remove the red cable from the positive terminal of the dead battery.
Step 7
After successfully jumpstarting your car, it’s important to keep the engine running for a while to allow the battery to recharge. Take a short drive or let the car idle for at least 20 minutes.
Remember, jumpstarting a car can be dangerous if not done correctly, so always exercise caution. If you’re unsure or uncomfortable with the process, it’s best to call a professional for assistance.
Jumper Cables: Frequently Asked Questions

There are many questions that arise when it comes to jumpstarting your automobile with jumper wires.
To help answer some of the most common inquiries, here are a few frequently asked questions about jumper cables.
Jumper cables are heavy-duty cables with insulated clamps on each end. They are used to transfer power from a working car battery to a dead or discharged battery in order to start the engine.
It is important to choose jumper cables with a sufficient gauge. The lower the gauge number, the thicker the cables, which allows for better current flow. For most passenger vehicles, a 10- to 12-gauge cable is sufficient.
While it may be tempting to use any available cables, it is crucial to use specifically designed jumper cables. Regular electrical cables or extension cords are not suitable for jumpstarting a car, as they may not be able to handle the high current flow required.
Yes, there is. Start by connecting the positive (+) clamp of the red cable to the positive terminal of the dead battery. Then, attach the other end of the red cable to the positive terminal of the good battery. Next, connect the negative (-) clamp of the black cable to the negative terminal of the good battery. Finally, connect the other end of the black cable to a metal, unpainted part of the vehicle with the dead battery, away from the battery itself.
Once the cables are properly connected, allow the working vehicle’s engine to run for a few minutes to charge the dead battery. Afterward, attempt to start the vehicle with the dead battery. If it starts successfully, keep the cables connected for a few more minutes to ensure the dead battery gets a proper charge.
Final Thoughts About Jumper Cables

Jumper cables can be a lifesaver when you find yourself with a dead car battery. They provide a quick and easy way to jumpstart your vehicle and get back on the road.
In this PowerVersity guide, we have covered everything you need to know about jumper cables – from understanding the different types and sizes to step-by-step instructions on how to safely jumpstart your car.
As we conclude this guide, it is important to emphasize the significance of preparedness. Keeping a set of jumper cables in your vehicle’s trunk is a simple yet essential step to ensure you are prepared for unexpected battery failures.
It is equally important to familiarize yourself with the process of jumpstarting a car before you actually need to do it.
Knowing the correct method and safety precautions will not only save you time but also prevent any potential damage to your vehicle.
Remember, safety should always be your top priority. Before attempting to jumpstart your car, be sure to carefully read your vehicle’s owner’s manual for any specific instructions or precautions.
Additionally, double-check that both vehicles are turned off and in park or neutral, and that the jumper cables are securely connected to the correct terminals.
In conclusion, jumper cables are a must-have tool for any driver.
Further Readings And References
HowStuffWorks: How to Use Jumper Cables


